Saturday 31 January 2015

Monthly Favourites - January 2015


Hi everyone! It's the first so it's time for my favourite things from the first month of 2015! 


First is these ankle boots from London Rebel. The first thing I liked about them is the colour. I love the shade of brown and they stood out to me from the black boots around them. They have a wood heel which I think is different and interesting. They are really comfortable and feel like I'm wearing wedges rather than heels so are good for everyday wear. They are no longer availiable from the London Rebel site but you can still buy them from No.1 shoes in NZ! Link at the bottom.


I have a new moisturiser this month which is Garnier Moisture Match. Since I started using it I have noticed my skin is brighter and makeup applies and blends very easily. I got the normal skin one but there is about 5 different ones available. 

During the holidays I have been spending a lot of time painting my nails. I love this Chi Chi glitter nail polish in the colour Kim Wannabee. It is their salon formula nail polish and I was not disappointed. As usual Chi Chi has done an amazing job on this product. There is almost more glitter than polish! Here's what I did with it.


I have still been working on my jewellery and a few weeks ago I made this rough amethyst necklace. I am very proud of this one and I love it so much I almost don't want to sell it! 

Next is a couple of things I got for Christmas. My grandma got me this belt. It is a Roxy one covered in studs and I love studs! I wear this belt heaps.

My sister got me this book which is wreck this journal. It isn't an ordinary book either. On every page it has a different way to wreck it. 

My favourite song of this month is Shake The Earth by Elephante ft. Lyon Hart. I will listen to this song on repeat! It is amazing and has such a good vibe.


That's it for this months favourites! Links to these are below.

-Alexis xx :)

Boots - Number One Shoes
Moisturiser - Farmers - or many other stores.
Chi Chi nail polish - Farmers
Wreck This Journal - Amazon or Whitcoulls
Belt - Roxy (sorry I can't find it online)
Necklace - Send me a message if you want it!!

Sunday 25 January 2015

Back To School - DIY Book Decorating


Hi everyone!
Not long until school now so I decided it was time to cover my books. Here is a simple DIY tutorial for a way to create unique books for school or anything else you want to decorate!

What You Need:
-Old magazines or printed out pictures - Mine 
were all rave and EDM pictures :)
-Books to cover
-Clear book cover - This can be found 
at most stationary stores
-Card
-Washi Tape
-Scrapbooking Paper
-Glue
-Scissors


1. Cut a triangle out of card to use as a template.


2. Use the template to cut out triangles from the pictures you chose and the scrapbooking paper. Cut some with the triangle upside down so all your pictures fit into the pattern. (Look at the finished picture so you see what I mean).


3. Lay out the pictures on the book them glue the where you want them. 


4. Add strips of washi tape for extra decoration if you want.


5. Cut off any extra paper from around the edges.


6. Cover your book with clear book cover. To do this cut it to the size of your book with an extra couple of cm around the edges. Fold the plastic cover in half then peel half the backing off. Slowly lay one side of your book down onto the cover then push out any air bubbles. Cut the corners then fold the extra over into the book. Repeat on other side.
This with stop your pictures from falling off and protect the book.


Done! This super simple and fun DIY creates unique books and shows off your personality. Have fun decorating your books!

Another idea - Try different shapes such a hexagons for different patterns. Just make sure you use a shape that fits together!

-Alexis xx :)


Saturday 24 January 2015

5 Quick Hairstyles For School

Hi everyone!
One of the biggest problems I have when it comes to school is getting up and getting ready on time. So here is 5 super quick hairstyles for if you are like me.


I will be making more videos soon so subscribe so you don't miss them! 
Also more back to school posts very soon!

-Alexis xx :)


Wednesday 21 January 2015

Bad Haircut :(


Hi everyone
So today I got a haircut for the first time in 2 years. Anyone who knows me or has even just seen me knows I love my hair so one of the worst things that could happen to me is a bad haircut. That is exactly what happened to me today. 
I have had a few bad haircuts before - mostly just things like my hair being cut uneven or on an angle which is quite noticable on my hair as I don't have layers but this is the worst. 
I love having long hair so when I went to get it cut I said to the lady doing it I just want a trim and I don't want it short. I showed her exactly how much I wanted off and everything was fine until I noticed how short she was cutting it. At that point it was too late to do anything so I had to let her finish.
As soon as I got to the car I started crying. She has cut off 3 times more than what I asked. I love having waist length hair so it was horrible suddenly having short hair. Luckily my hair grows fast so hopefully it will only be a few months until it is long again.

Before and after:

I had a few hair tutorials I was planning, which included a boho/hippie hairstyle that I love, but I will not be able to do them until my hair is longer. 
In the meantime I will try to make the best of a bad situation and come up with some hairstyles for shorter hair and I will of course continue with the back to school posts. 
Lesson: Don't be so trusting of people I haven't met before when it comes to cutting my hair.
If you have any post requests please leave a comment!

-Alexis xx :)


Tuesday 20 January 2015

Back to School - Fashion Inspiration


Hi everyone! 
Lately I have been spending time on Pinterest getting ideas for school appropriate clothes. It is my last year in high school so I get to wear mufti every friday and the whole last term (YAY!) 
So here are some ideas I collected. These would be good for the end of summer and heading into autumn in the first term.

For links to where the photos are from please look and my board on Pinterest here!


-Alexis xx :)

UPDATE: Back to school - fashion, DIY and hair, Makeup and more!


Hi everyone! It's almost time for school again here in NZ :( so in the couple of weeks leading up to school I will be putting up a few back-to-school related posts. These will include DIY's, school fashion look books and inspiration and hair tutorials. If there is anything you would like me to include please let me know in the comments!

I am also planning regular posts which will include makeup and hair tutorials and I will be continuing monthly favourites as usual. I am also hoping to get a blog collab somewhere in there as well. So it will be a busy end of January and February!

I am still making jewellery! You can find this at my Instagram.

Let me know if you have any post requests!

-Alexis xx :)


Monday 19 January 2015

Leather, Stripes and Khaki


Top & Skirt - Glassons, Here and Here
Jacket - old, Similar Here 
Heels - old

Hi everyone! I've been shopping and I tend to get carried away every time and shop to the point I can't carry everything! So because of the amount of new clothes I got I will be putting up a few fashion posts.

This outfit is nice for summer and would be casual with flat shoes so is good for everyday wear but with heels looks a bit dressier. I got this top and skirt from Glassons and I am loving khaki at the moment. The skirt is high wasted so would look good with a tucked in shirt also. 
The jacket is a few years old and I love wearing it. I think it looks really good with the top and the skirt and matches the heels. The heels are old and I couldn't find any similar ones but most black heels would work well.
The necklace and bracelet were made by me and can be found on my Instagram.

-Alexis xx :) 

Sunday 18 January 2015

Hair Tutorial - Side Plait


 Hi everyone
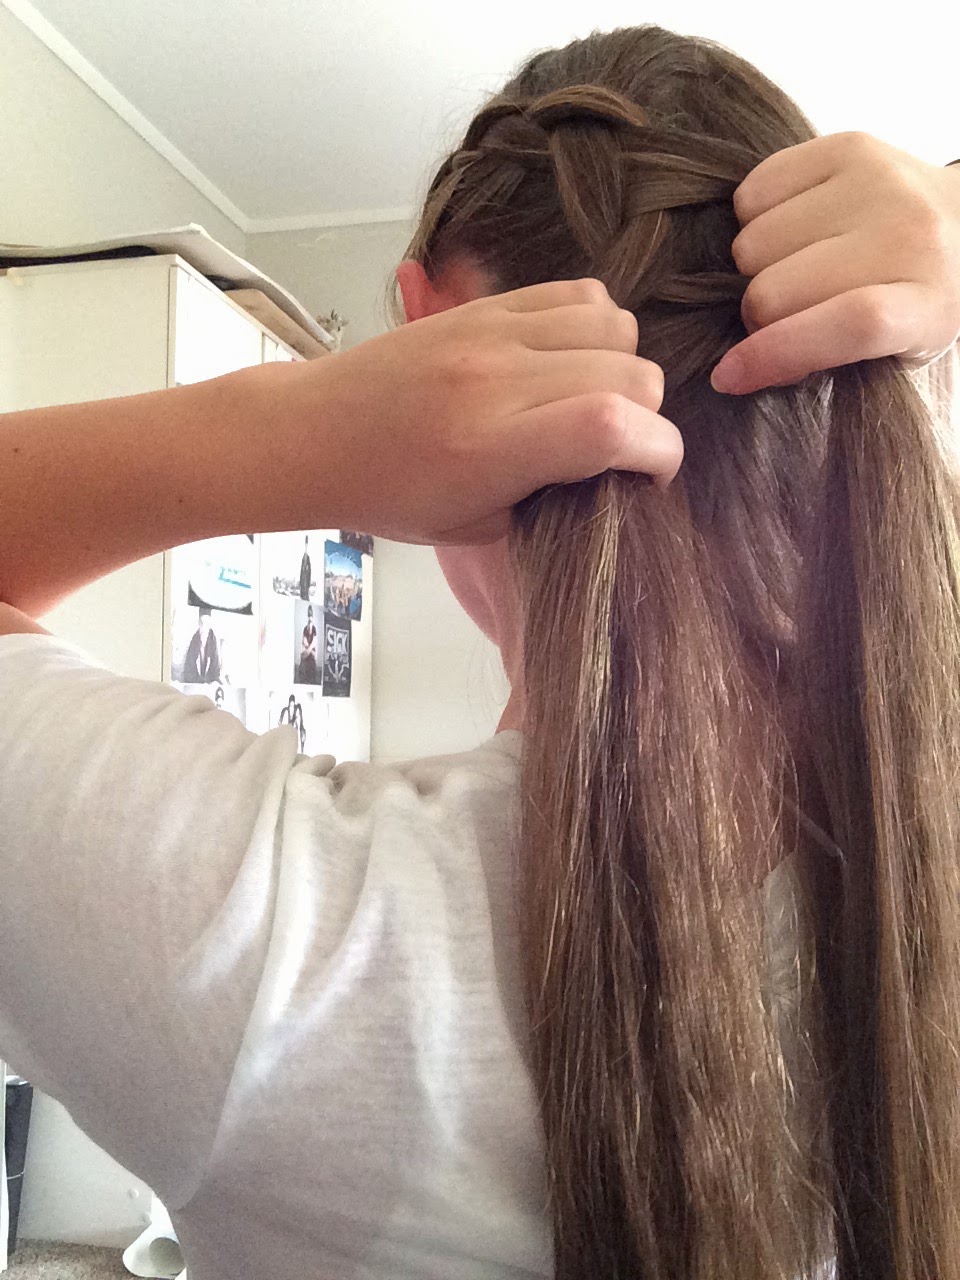
It's time for another hair tutorial! This is how to do a side plait which is super quick and easy. I like this because it gives the same look from the front as having the side of you hair shaved without actually shaving it. Another way to do this would be to do two smaller plaits instead of just one.


1. I usually straighten my hair first as it is frizzy but you don't have to. Start by creating a deep part on either side of your head.


2. Grab a small section from the front on the side that has less hair and start plaiting underneath so the plait stands up.


3. Keep plaiting right around to the back of your head.


4. Start to plait underneath the hair you want left out right around the bottom of your head to the other side.


5. Finish the plait off and tie it with a small hair tie.


 Done! Super easy once you get the hang of it. 
If you have anything you would like me to post leave a comment!

-Alexis xx :)


Tuesday 6 January 2015

Hair Tutorial - Edgy Plait


Hi everyone!
Here is a tutorial for the edgy plait I posted a picture of on Instagram a few weeks ago. I usually do this hair style for work as it keeps my long hair out of the way and doesn't fall out.


1. Start with dry or wet hair depending on what is easiest for you. If you have fine hair you may want to do this with slightly dirty hair or add dry shampoo. My hair is thick so I am just doing it with clean and slightly damp hair.


2. Create a quiff in the front by grabbing a section and teasing it underneath then pinning it back with a couple of bobby pins.


3. Grab a section behind the clips and start french-plaiting underneath rather than over the top so the plait is out from your head more.


4. Plait right down to the bottom of you head. All your hair should be plaited in at this point.


5. Continue the plait to the bottom of your hair.


6. Tie it off and give it a spray with hairspray.


All done!!
Tip: For awesome hair two days in a row do this plait with wet hair and leave in overnight. When you take it out the next morning you will have amazing waves with little effort! I will usually plait my hair in the morning before work and leave it in for that day and overnight to get the waves like in the picture below. To avoid awkward kinks in the front remove the bobby pins before going to bed.


If you have any requests for hair tutorials leave a comment!

-Alexis xx :)