Showing posts with label Hair. Show all posts

Tuesday, 7 July 2015

Hair Straightening For Beginners


Hi everyone

Finally I have another video for you! This is a tutorial on hair straightening for beginners or people who find it difficult to straighten their hair. I know I posted something on hair straightening a while ago but I thought it was about time I updated it and I go into more detail in this one.


Thanks for watching. Please subscribe to my Youtube so you don't miss any of my videos!

-Alexis :)

Tuesday, 30 June 2015

DIY - Flower Hairclips


Hi everyone

My high school ball is coming up in a few weeks and the theme is Enchanted Forest so I have decided I want flowers in my hair. I made these flower hair-clips which are going to be perfect for the night and below is the instructions of how I made them.

Supplies

-Fake flowers - I got mine from the dollar store
for only a couple of dollars
-Bobby pins
-Wire - I used 28 gauge
-Needle
-Pliers (If you have them, they are helpful)
-Wire Cutters
-Hot glue (optional)


1. Pull the flowers off the stems


2. Cut the stem bit down if it is too long. Don't cut it all off or the flowers will fall apart.


3. Push the needle through the stem to make a hole.


4. Put the wire through the holes.


5. Wrap the wire around the bobby pin.


6. Make sure the ends of the wire are pushed flat.


7. If the flowers feel a bit loose you can put a little hot glue over it to hold it a bit more.

 
Done!


That's all there is to it! Super simple and very pretty for any hairstyle. 
Over the next few weeks I will have more posts relating to my ball including my makeup and my final look for the night!

If you have anything you would like me to post leave a comment!

-Alexis :)

Thursday, 30 April 2015

Hair Tutorial - Messy Hippie/Bohemian Hair!!


Hi everyone!

I have finally got another hair tutorial for you! This tutorial is how to do the hippie/bohemian hairstyle which I had in my outfit post which you can see here. I love this hairstyle because it only takes a few minutes to do and looks awesome! 


Leave me a comment if there is any hair tutorials you would like to see or anything else you would like a video on! 

-Alexis :)


Thursday, 5 February 2015

Hair Tutorial - My Washing And Straightening Routine For Wavy/Curly Hair


Hi everyone!
As you probably already know I have very thick wavy/curly hair. This means washing and straightening takes a while but I have learnt a few things that make it a bit easier. So here is my washing and straightening routine!

I wash my hair using Tresemme shampoo. If my hair still feels a bit dirty after one wash I will wash it again with the same shampoo. 
After that I use Pantene hydrating curls conditioner. While the conditioner is still in my hair I brush all the knots out of my hair with my hands then wash it out.
To dry my hair I just squeeze all the water out then wrap it in a towel for a while. I don't rub my hair with the towel because this makes it frizzy.
If I need to dry my hair quickly I use a hairdryer with a diffuser on the end.


When my hair is completely dry I can straighten it. I don't brush my hair because this also makes it frizzy so if there is any knots I carefully brush them out with my fingers. I am using my Nume In-vouge straightener set at 390 °F


I straighten my hair in 3 or 4 different sections starting at the bottom. If the underneath isn't straight there is no way your hair is going to look perfectly straight at the end.


I take a small section and slowly run the straightener down it starting as close to my head as possible. Running it slowly down works better than having to go over it heaps of times and does less damage. If the ends still aren't straight I go over them again starting from about halfway down my hair.

After I straighten the underneath I let down another section of hair and straighten that. I keep doing this until it is all straight.


So that is my washing and straightening routine! I hope this helps people with hair like mine!

-Alexis xx :)

Saturday, 24 January 2015

5 Quick Hairstyles For School

Hi everyone!
One of the biggest problems I have when it comes to school is getting up and getting ready on time. So here is 5 super quick hairstyles for if you are like me.


I will be making more videos soon so subscribe so you don't miss them! 
Also more back to school posts very soon!

-Alexis xx :)


Wednesday, 21 January 2015

Bad Haircut :(


Hi everyone
So today I got a haircut for the first time in 2 years. Anyone who knows me or has even just seen me knows I love my hair so one of the worst things that could happen to me is a bad haircut. That is exactly what happened to me today. 
I have had a few bad haircuts before - mostly just things like my hair being cut uneven or on an angle which is quite noticable on my hair as I don't have layers but this is the worst. 
I love having long hair so when I went to get it cut I said to the lady doing it I just want a trim and I don't want it short. I showed her exactly how much I wanted off and everything was fine until I noticed how short she was cutting it. At that point it was too late to do anything so I had to let her finish.
As soon as I got to the car I started crying. She has cut off 3 times more than what I asked. I love having waist length hair so it was horrible suddenly having short hair. Luckily my hair grows fast so hopefully it will only be a few months until it is long again.

Before and after:

I had a few hair tutorials I was planning, which included a boho/hippie hairstyle that I love, but I will not be able to do them until my hair is longer. 
In the meantime I will try to make the best of a bad situation and come up with some hairstyles for shorter hair and I will of course continue with the back to school posts. 
Lesson: Don't be so trusting of people I haven't met before when it comes to cutting my hair.
If you have any post requests please leave a comment!

-Alexis xx :)


Sunday, 18 January 2015

Hair Tutorial - Side Plait


 Hi everyone
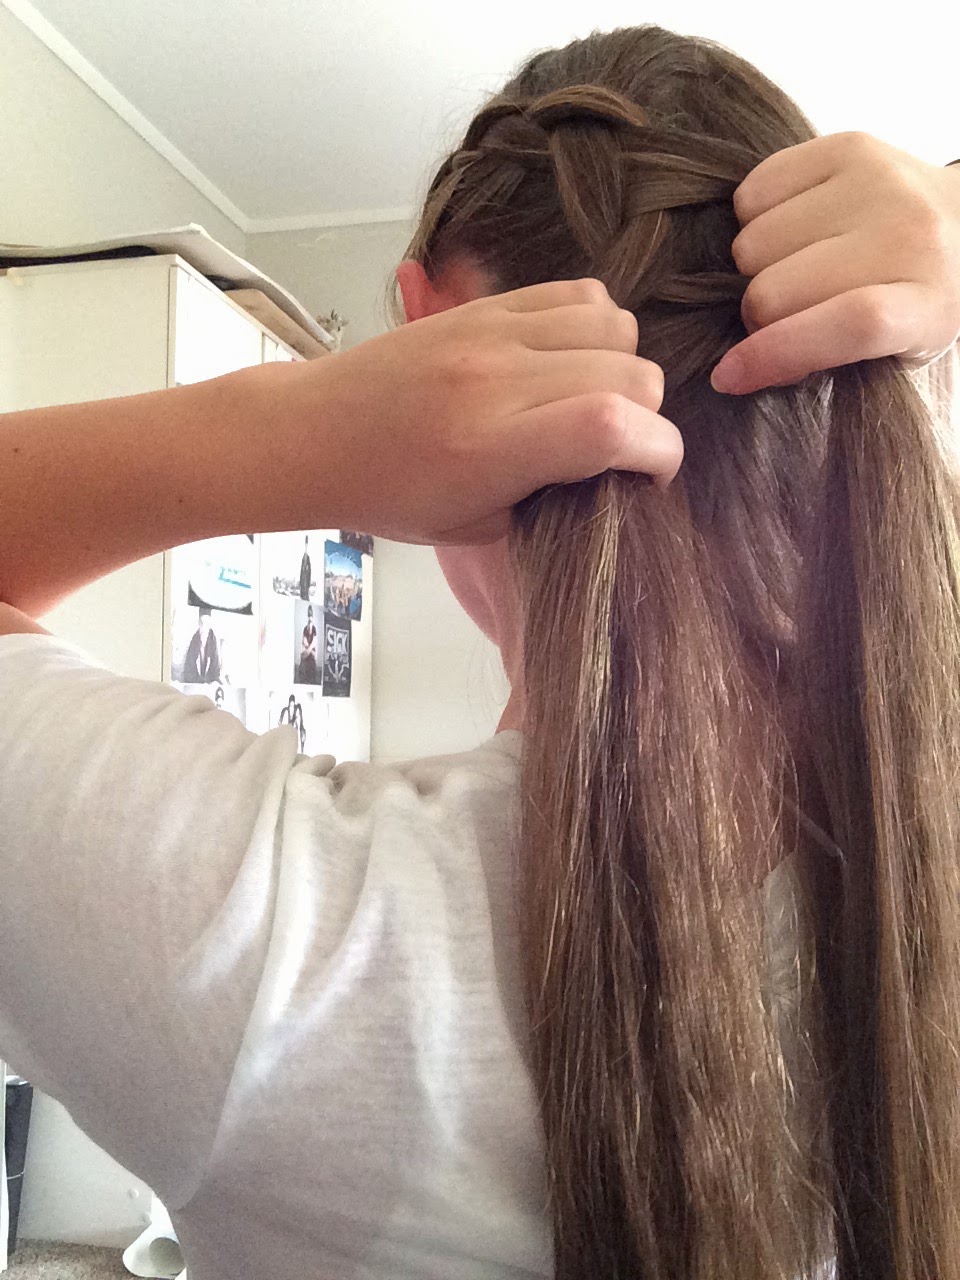
It's time for another hair tutorial! This is how to do a side plait which is super quick and easy. I like this because it gives the same look from the front as having the side of you hair shaved without actually shaving it. Another way to do this would be to do two smaller plaits instead of just one.


1. I usually straighten my hair first as it is frizzy but you don't have to. Start by creating a deep part on either side of your head.


2. Grab a small section from the front on the side that has less hair and start plaiting underneath so the plait stands up.


3. Keep plaiting right around to the back of your head.


4. Start to plait underneath the hair you want left out right around the bottom of your head to the other side.


5. Finish the plait off and tie it with a small hair tie.


 Done! Super easy once you get the hang of it. 
If you have anything you would like me to post leave a comment!

-Alexis xx :)


Tuesday, 6 January 2015

Hair Tutorial - Edgy Plait


Hi everyone!
Here is a tutorial for the edgy plait I posted a picture of on Instagram a few weeks ago. I usually do this hair style for work as it keeps my long hair out of the way and doesn't fall out.


1. Start with dry or wet hair depending on what is easiest for you. If you have fine hair you may want to do this with slightly dirty hair or add dry shampoo. My hair is thick so I am just doing it with clean and slightly damp hair.


2. Create a quiff in the front by grabbing a section and teasing it underneath then pinning it back with a couple of bobby pins.


3. Grab a section behind the clips and start french-plaiting underneath rather than over the top so the plait is out from your head more.


4. Plait right down to the bottom of you head. All your hair should be plaited in at this point.


5. Continue the plait to the bottom of your hair.


6. Tie it off and give it a spray with hairspray.


All done!!
Tip: For awesome hair two days in a row do this plait with wet hair and leave in overnight. When you take it out the next morning you will have amazing waves with little effort! I will usually plait my hair in the morning before work and leave it in for that day and overnight to get the waves like in the picture below. To avoid awkward kinks in the front remove the bobby pins before going to bed.


If you have any requests for hair tutorials leave a comment!

-Alexis xx :)

Friday, 19 December 2014

Nume In-Vogue Review

Hi everyone!
Recently I bought a Nume hair straightener so here is my review of it!


First thing I should let you know is I have thick, curly/wavy, frizzy hair. I got the In-vogue straightener with the Titanium plates as this was recommended for thick hair. 
I placed my order the half way through November and it took a month to get to NZ from the US. I am not to bothered about it because I know they were having technical difficulties around that time but it would have been nice to get it quicker. Nume has heaps of sales and I got about $120NZD off mine using a discount code. And I of course got it in purple. :P
When it arrived the packaging definitely impressed me. I love the tube design. I was also happy they sent me a NZ wall adapter so I didn't have to buy one.
The straightener works really well on my hair. The temperature is able to be changed and I was able to straighten my hair quickly. There was also very little frizz and the frizz I had was only because my hair is due to be cut.

So overall I love this straightener! You can buy it here.

-Alexis xx :)